How to Make Halloween Napkin Holders

DIU Halloween Napkin Holders banner

Halloween is the best time of year to make things!  All of the spookiest, creepiest, darkest ideas you’ve had for the past year can all finally be purged!  MUAH HAHAHAHAHA!

But seriously…  Go wild!  Go nuts!  Go insane!

the_texas_chainsaw_massacre_image

Well… Maybe not THAT insane, but have fun.

Here is a fun Halloween craft perfect for when you’re entertaining guests!

Click here for the downloadable PDF! – Halloween Napkin Holder Directions

DIU Halloween Napkin Holders

Dress It Up Halloween!

Over 110 fabulous Halloween Ideas shared by bloggers. #halloweenideas #halloween


Woohoo, it’s Saturday! But that also means it’s the last day of our Halloween Bash blog hop (sad face). I have just loved seeing everyone’s creative Halloween projects and I hope you have too!


My creation for this fun Halloween blog hop is………


JJB halloween bags

There isn’t a holiday more fun than Halloween.  Parties, candy, horror movies and the endless possibilities for costumes makes it my absolute favorite day of the year.  And what could be more fun than sitting down with your kids to craft their own Halloween trick-or-treat bags?!

Here’s how ya make ’em!

JJB halloween pumpkin bag

Dress It Up Pumpkin Trick-or-Treat Bag

WHAT YOU NEED:

  • Colored felt
  • Needle & Embroidery Thread
  • Scissors
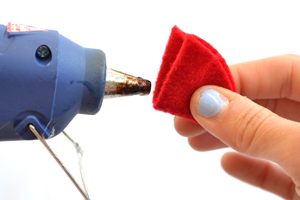
  • Hot glue gun and glue
  • Stuffing
  • Dress It Up Halloween button packs (We used “Ghoulies and Ghosties Boy”, “Ghoulies and Ghosties Girl”, “Beware of Ghosts”, “Glitter Pumpkins”, “Graveyard Ghosts”, “Tiny Fright Night”, and “Jacks in Hats”, but you can use any of your favorites!)

WHAT TO DO:

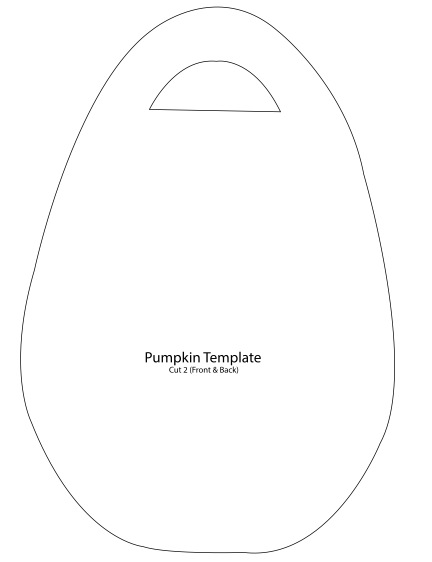
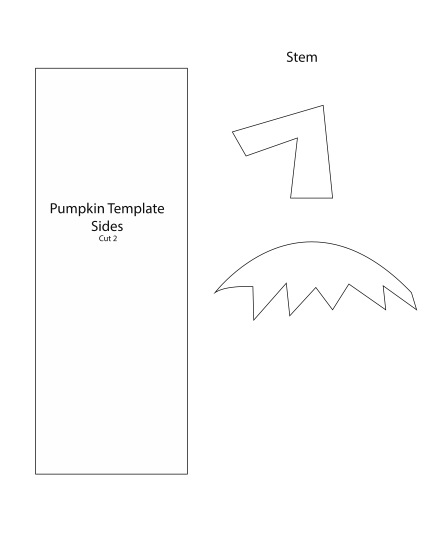
  1. Take your colored felt and cut out your front and back of the bag (Make sure to cut out hole for handle). Refer to the template below. Trace template onto felt and cut out two. Now take your Side Template and cut out two.
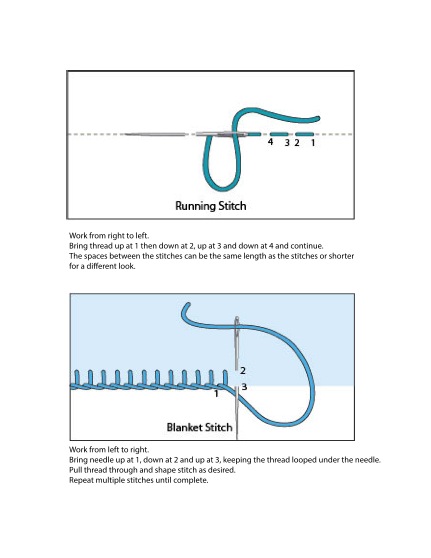
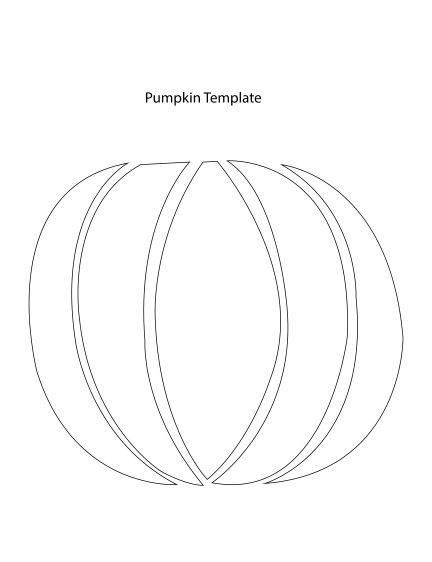
  2. To make pumpkin trace from template below and cut out. Use the running stitch to sew pumpkin onto front. Keep doing the running stitch all the way around the piece, once you have come to last inch and a half, place stuffing inside of piece, making sure to get it to puff out a bit. Complete with running stitch to close. Knot on the back to keep stitching in place. Continue this process for all other pumpkin pieces.
  3. Cut out Stem from template below. Use Running stitch to sew onto front. You do not have to stuff these pieces because they are so small.
  4. Once you have everything you want on your bag pieces our now going to hand sew your pieces of felt together. Take your embroidery thread, and thread onto needle. Make sure to tie knot in the end before you begin. First sew two sides together, using the running stitch. You should now have one long piece for your sides.
  5. Using the blanket stitch you will now sew your pieces together. Take your Back and side piece and begin the stitch, make sure the sides are even so the bag sits upright. Once the side and Back piece is together stitch on front. Make sure to keep all knots from thread inside the bag.
  6. Now that all your pieces of felt have been sewn together your bag should stand on its own. Glue desired Dress It Up Halloween buttons onto bags. Enjoy your Halloween!

Stitchespumpkin templatePumpkin template 2pumpkin template 3


JJB Halloween Spider Web Bag

Dress It Up Spider Web Trick-or-Treat Bag

WHAT YOU NEED:

  • Colored felt
  • Needle & Embroidery Thread
  • Scissors
  • Hot glue gun and glue
  • Dress It Up Buttons (We used “Candy Corn”, “Fright Night”, “Glitter Pumpkins”, “Spiders!”, “Spooktacular” and “Happy Haunting”, but you can use any of your favorites!)

WHAT TO DO:

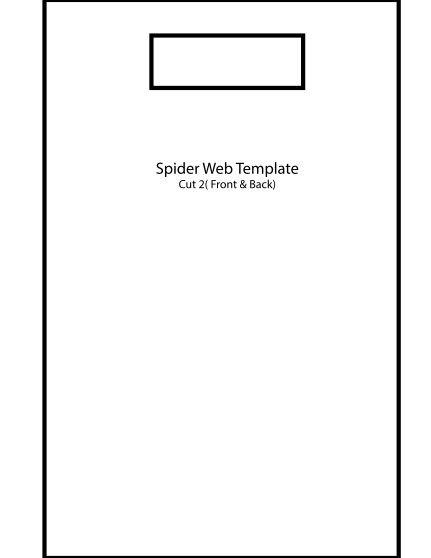
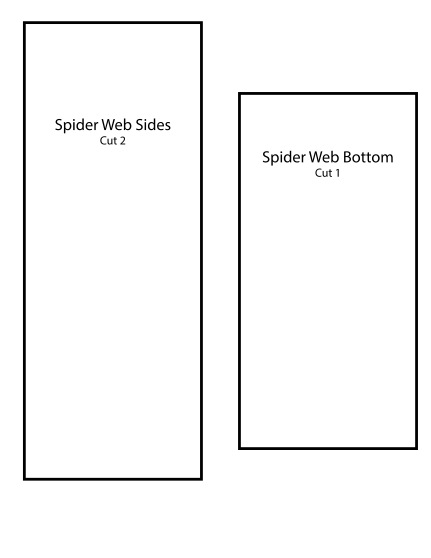
  1. Take your colored felt and cut out your front and back of the bag (Make sure to cut out hole for handle). Refer to the template below. Trace template onto felt and cut out two. Now take your “side template” and cut out two. Cut one “bottom template”.
  2. To make spider web, take felt and cut ¼ inch strips. Keep long strips for vertical web and cut desired length for horizontal pieces. Glue down once you have placed everything accordingly.
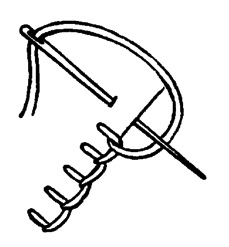
  3. Once you have everything you want on your bag your now going to hand sew your pieces of felt together. Take your embroidery thread, and thread onto needle. Make sure to tie knot in the end before you begin. Using the blanket stitch, sew one side to bottom. Then “back template” to bottom, then other side to bottom and finally the front. You should now have all 4 sides attached to the bottom. You now want to sew up the sides to the front and back to complete the bag.
  4. Now that all your pieces of felt have been sewn together your bag should stand on its own. Glue desired Dress It Up Halloween buttons onto your bag. Enjoy your Halloween!

blanket stitch

spider web template 1

spider web template 2JJB halloween skull candle box Creepy Crypt Candle Box Directions

DIU Halloween Napkins

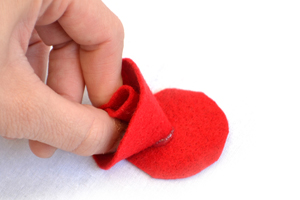
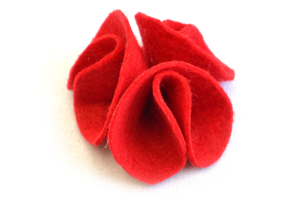
Halloween Napkin Holder Directions

JJB Halloween mummy bowl

Monstrous Mummy Candy Bowl Directions

Thank you for looking and happy haunting!

DGS


So here’s the final installment of fabulous Halloween ideas from our creative blogging friends. Join the blog hop & click on each of the links below, for the Halloween projects you’d like to see in more detail and it’ll take you right to that post with additional information and photos on how to create it. Have fun and pin away!

Over 110 creative Halloween projects and ideas for Halloween fun. #halloweenprojects #halloween #diyhalloweenideas

Mini Ghost Pumpkin Cakes
Easy Halloween Sculpey necklace
Owl-ween Party
Easy Halloween Cupcake Wrapper Wreath
Halloween Polka Dot Pillow
Halloween Dinner Party Table Setting
Halloween Party Garland
Halloween Oreo Truffles
Skeleton Hat
Fabric Halloween Wreath Tutorial
Pumpkin Carving 101
Dress It Up Halloween Trick-or-Treat Bags
Lips as Red as the Rose (an ICE Resin belt buckle)
Easy Halloween Caramel Apple Dippers
Raccoon Mask
Pumpkin Tea Towels
Easy Halloween Window Cling

Follow our Fabulous Halloween Ideas Pinterest board for even more inspiration!

Follow Design Dazzle’s board Fabulous Halloween Ideas on Pinterest.

Thanks to all 110+ fabulous bloggers participating! We’d love for you to visit their blogs and see what else they’re up to!

100 Directions || 365daysofcrafts || a girl and a glue gun || A Prudent Life || Addicted 2 DIY || Albion Gould || Ashlee Marie || Atta Girl Says || Bakerette || BD Design || BellaGrey Designs || Black and White Obsession || Bloom Designs Online || Blue i Style || Bombshell Bling || bumblebreeblog || C.R.A.F.T. || Celebration Lane || Clean and Scentsible || Clearsnap || Confetti Sunshine || Crafts by Courtney || Creations by Kara || Creative Juice || Cutesy Crafts || Design Dazzle || Dress It Up Crafts || Echoes of Laughter || Everyday Party Magazine || Eye Candy Creative Studio || Fairfield World || Fearlessly Creative Mammas || Five Heart Home || Fizzy Party || Free Time Frolics || Frenchie || FrugElegance || Glued To My Crafts || GreatStitch || Happiness is Homemade || Here Comes the Sun || Home Maid Simple || Honeybear Lane || hoopla palooza || Hydrangea Hippo || I Dig Pinterest || ICE Resin || inkhappi || Insitefull Living || It’s Sew Lorine || Jaco’lyn Murphy || Jen A. Street || Just My Little Mess || Just Us Four || Katarina’s Paperie || Kiki and Company || Laura Kelly’s INKlings || Let’s Eat Grandpa || Let’s Go Junking || Liz on Call || Love The Day || Made by a Princess || Made From Pinterest || Made to be a Momma || Major Hoff Takes A Wife || Make Life Lovely || My Craftily Ever After || My Daylights Blog || My Insanity || Nature’s Knockout || Not Just A Mommy || One Creative Mommy || Organize & Decorate Everything || Our Thrifty Ideas || Paleo Priests || Persia Lou || Pink Cake Plate || PinkWhen || Play. Party. Pin. || Practical Parenting || Reclaim Yourself Retreat || See Vanessa Craft || She’s Crafty || Simple Sojourns || Simply Designing || Soiree Event Design || Sowdering About || Splendid Design || Stuffed Suitcase || Super Simple with Terri O || Suzys Sitcom || Sweet and Simple Magazine || Swish Printables || Sypsie Designs || That’s What Che Said || The Benson Street || The Cards We Drew || The Gunny Sack || The Happy Scraps || The Life of Jennifer Dawn || The Scrap Shoppe || The Things I Love Most || Tikkido || Two Thirty~Five Designs || Wait ‘Til Your Father Gets Home || Walnut Hollow Blog

National Chocolate Milkshake Day!!!

DIU milkshake day banner

Happy National Chocolate Milkshake Day!  I spent the morning making the most delicious vegan milkshakes on the planet when I heard a knock at my door.  As I opened the door, I discovered an envelope with my name written on it sitting on my welcome mat.  I carefully ripped open the envelope, unfolded the contents, and began looking over the foreign characters comprising the arcane message scribbled onto the discolored parchment.  Being a fan of cryptography – and never one to let a good riddle get the best of me – I sat down at my kitchen table and started to crack the simple substitution cipher.

One character.  Five characters.  Four characters.  Nine characters.

Some vowels started falling into place.  I was almost half-way through solving the mystery when I started thinking that sipping on a chocolatey, vegan milkshake would definitely get the gears in my brain working smoother.

As I walked into my kitchen, I notice my backdoor is wide open.  AND ALL OF MY MILKSHAKES ARE GONE!

I look down at the half-deciphered message –  “I -RI– -OUR -I–S-A-E” – as my eyes focus on a piece of paper laying on the hardwood floor of my kitchen.  I bent down and picked up the paper; a glossy cardstock with a photograph on the underside.  I flipped it over.

08_ddl_lgl

Confused, I looked back to the riddle on my kitchen table… A cold wave of clarity swept over my body.  My knees began to shake.  My fists clenched in rage.  My stomach growled in hunger.

“I… DRINK… YOUR… MILKSHAKE.”

DANIEL DAY LEWIS TRICKED ME!  HE DRANK IT UP!  THAT NO GOOD, ROTTEN- without the smooth, chocolatey milkshakes satisfying my sweet tooth… With my chest about to beat out of my chest…  With vengeance on my mind… I got to work.  To ease the sting of the situation, I began to craft.

The pain may have only been temporary, but revenge will be sweet…  Pun INTENDED, Mr. Lewis.  Watch your back.


DIU milkshake day


Happy International Lefthanders Day!!!

DIU dylan dinosaur pillow banner

Today is International Lefthanders Day! Being a lefty in a righty world can have its problems, but I find it more of a reason to celebrate than fret about the fact that on average we die 9 years earlier than righties. Depending on the study, somewhere between 7-15% of the human population is left-handed, which means there are roughly 700 million people scattered around the world that are incredibly irritated after sitting next to you in a restaurant.

Not everything in a lefty’s life is backwards, hard, and annoying though. Lefties are more likely to be geniuses, artists, presidents, and better looking. (Maybe I made that last one up…) Great thinkers Albert Einstein, Charles Darwin, Benjamin Franklin, Sir Isaac Newton, musicians Kurt Cobain of Nirvana, Jimi Hendrix, Billy Corgan of Smashing Pumpkins, Paul McCartney, Robert Plant, and artists Albrecht Durer (one of my all-time favorites!), Raphael, Michelangelo, AND Leonardo are all left-handed and most likely hate spiral-bound notebooks as much as I do.

Animals can also be left-handed! About 50% of cats are southpaws and in lobsters, you can tell their handedness by which claw is bigger (southclawed?). Scientists have even found cave paintings they believe to have been created by a lefty artist!

Despite the odds stacked up against us from cultures believing we are evil, sorcerers (how cool would that actually be?), and cursed, we are here to stay!

DIU dylan dinosaur pillow

How to Make a Butterfly Bead Wreath!

JJB butterfly bead wreath banner

While half of the summer is already behind us, there are still a lot of days left to keep your kids occupied before they go back to school.  Between now and that bitter/sweet first day of the school year, we will continue to give you plenty of fun craft ideas for you and your family to enjoy!

Butterflies are fascinating and beautiful creatures that have been around for at least 50 million years.  Not only are they aesthetically pleasing to look at, but they are important to ecosystems and biodiversity!  Butterfly-Conservation.org has a great list of plants you can add to your garden that will attract butterflies and help in the conservation of various butterfly species.  Hanging this wreath near your garden or in your home can act as a great conversation starter!  When someone compliments your wreath, that’s your cue to strike up a conversation about conservation!


Butterfly Bead Wreath

What you’ll need:

  • Grapevine wreath (any size)
  • Ribbon (various colors)
  • Nicole Crafts Butterflies
  • Colored felt
  • Scissors
  • Hot glue
  • Thin wire
  • Thick aluminum wire (18 gauge)
  • Jesse James Beads “Design Elements” and “Inspiration” packs

What to do:

  1. Begin by drawing a butterfly onto black felt or tracing a butterfly template (see Example I), folding the felt in half and cutting the shape out so you have two identical butterfly shapes.       Do this for all of your butterflies. Making the butterflies in various sizes, shapes and colors will make your wreath more visually interesting than if they were all the same size, shape and color.       While choosing to draw, rather than trace will take longer, it will benefit you in the long run!
  2. Cut 2, 10” pieces of thick aluminum wire and wrap them around each other in their centers, making an X. Wrap them around each other a couple of times to make sure they are secure.
  3. Glue the wire X in the center of a black felt butterfly. If the ends are too long, cut them. Then glue another black butterfly on top and seal the edges with glue. This will allow your butterflies to keep their shape.
  4. Fold your colored felts in half and cut teardrop shapes out in various sizes, shapes and colors. Folding the felt in half before cutting will provide you with two identical shapes that you can use to create the symmetrical markings on your butterflies!
  5. Once all of your colored teardrops are cut out, begin figuring out your placement on the black butterflies.       When you have your butterfly figured out, glue the teardrop shapes to the black butterfly.
  6. Make as many butterflies as you’d like!       Made them in black, pink, with beaded centers, with different colors- go wild and have fun!
  7. Lay out your butterflies on the wreath to see where you’d like to put them. Add your Nicole Crafts Butterflies, as well. Once you are happy with the placement of your butterflies, glue them to the wreath.
  8. With your various ribbons, begin wrapping them around the wreath as many or as few times as you’d like and glue the ribbon to the back of the wreath to secure it.
  9. Take your Jesse James Beads “Design Elements” packs and thread the beads onto your thin wire. Crimp the ends or bend the ends around to stop the beads from coming off the wire.
  10. Wrap the beaded wire around the wreath.
  11. Hang, enjoy, and start some conversations!

Butterfly Bead Wreath template

JJB butterfly bead wreath


Christmas in July!? How To Make Felt Ornaments!

JJB Christmas Felt Ornaments banner

Halloween is my favorite holiday, but since I treat EVERYDAY like it’s Halloween, I guess we can devote a post or two to Christmas in July.  While you’re relaxing by the pool, barbecuing, or planning fun things to do over your summer vacation, we are dreaming up a ton of fun things for the holidays.
For example, check out these felt Christmas ornaments we made!

Felt Christmas Ornaments

What you’ll need:

  • Colored felt
  • Foam ball (varying sizes)
  • Scissors
  • Hot glue gun and glue
  • Ribbon
  • Jesse James Beads
  • Dress It Up Buttons (We used “Mini Cookie Cutters”, “Glitter Holly”, “Pearl Snowflakes”, “Red Poinsettias”, “A Keepsake Christmas”, but you can use any of your favorites!)

What to do:

  1. Take your colored felt (we used red and white) and make a 2.5” fold. Fold it over two more times. Now, cut as many circles, 2” in diameter, as your folded piece of felt will allow. Because you folded the felt, you will get four 2” circles for every circle you cut. You will need about 75-90, 2” circles for a 3” foam ball.
  2. Follow the instructions the same as step 1, but make your circles 1” in diameter. You will need three 2” circles for every 1” circle, so cut about 25-30 1” felt circles.
  3. Heat up your hot glue gun and get ready to use it! Take a 2” felt circle and fold it in half, then fold it in half again, giving you a felt triangle with a 90 degree angle. Put some hot glue in the fold and near the corner at the bottom of the triangle. (See Example I)
  4. Place folded 2” felt circle on 1” felt circle, standing up with the fold facing the center of the 1” circle and pinch the center at the bottom to give it shape. (See Example II)
  5. Follow Steps 3 and 4 two more times to finish each 1” circle. (See Example III)
  6. Make as many felt pieces as you have 1” circles, with three 2” circles on each.
  7. Begin to hot glue the finished felt pieces onto the foam ball, placing them close enough together to cover all of the foam underneath. You can also paint the foam ball to ensure you won’t see white under the felt.
  8. Once your foam ball is covered with the finished felt pieces, cut a piece of ribbon (about 9” per foam ball ornament you are making). Thread both ends of the ribbon through your Jesse James Bead and tie a knot at the bottom large enough to stop the ribbon from sliding through.
  9. At the top of your ornament (whatever you would consider the “top”) put a button of hot glue in the center of the finished felt piece (where the three folded 2” circles converge) and place your bead in the center, knot end first. This will allow you to hang the ornament from your tree!
  10. Select your favorite “Christmas Collection” Dress It Up button packs and hot glue to the felt ornament
  11. Make as many as you’d like and hang them on your tree!


Example I

Example I

Example II

Example II

Example III

Example III


JJB Christmas Felt Ornaments

And as always, if you made something fun, share it with us!

Follow us on Instagram at http://www.instagram.com/dressitupcrafts

Like us on Facebook at http://www.facebook.com/dressitupbuttons

TUTORIAL TUESDAY! How To Make A Bulletin Board For Your Craft Room!

JJB cute as a button bulletin board banner

I’m incredibly scatter-brained and I’m always knee-deep in multiple projects at any given time.  As I’m working on something for my living room, I have an idea for a project for my dining room.  If I don’t jot it down quickly, I’ll either drive myself crazy trying to remember what that idea was or I’ll forget about it altogether.  Since I’m sure there are many people with the same problem, I wanted to show you how to make a cute bulletin board for your craft room!

…Now we just need to remember to use it!

“CUTE AS A BUTTON” BULLETIN BOARD

What you’ll need:

  • Assorted decorative paper
  • Nicole Trendy Expressions 8×10” wood frame
  • Mod Podge matte finish
  • Corkboard
  • Fabric
  • Ribbon
  • X-Acto knife
  • Cutting mat
  • Scissors
  • Hot glue
  • Lace trim
  • Cricut Craft Cutter and vinyl (optional)
  • Dress It Up Buttons (“A Stitch in Time”, “Sewing Room”, and “Vintage Grab Bag”)

What to do:

  1. Take the glass and backing out of the frame and begin ripping your decorative paper.
  2. Coat an area of your frame with Mod Podge and stick your piece of paper to it, coating over the paper to flatten it out. Cover your entire frame and don’t worry about the edges not being crisp and clean; you’ll take care of that later!
  3. While waiting for the Mod Podge to dry, cut your corkboard to the size of the frame’s opening.
  4. Put your fabric facedown on your table or desk and place the cork on top of your fabric. Cut the fabric around the cork, leaving at least an inch on all sides.
  5. Stretch and glue the fabric to the back of the cork, making sure the fabric stays tight all the way around.
  6. Cut strips of ribbon and lay them out on your fabric in the pattern you would like then glue the ribbon to the edges of the cork/fabric. Once all of the ribbons are glued in place, flip it over and secure the ribbons to the back with glue.
  7. When the Mod Podge is dry, put the frame face down on your cutting mat and carefully cut the excess paper away from the edges of the frame.
  8. Place and secure the fabric and ribbon covered corkboard into the frame.
  9. Cut out the text using your Cricut and the template below or hand-draw the text on a decorative piece of paper using marker, pen and ink, or paint.
  10. Cut fun shapes out of a different decorative paper (containing with your text/vinyl text) and line the back of the paper with lace trim, securing with hot glue.
  11. Place buttons around frame and figure out where you would like them to go.
  12. Glue paper/lace trim pieces to frame, as well as the buttons.
  13. Hang your new “Cute as a Button Bulletin Board” on the wall and never forget anything again! (Or at least try not to…)

JJB cute as a button bulletin board

INSTAGRAM CONTEST!

Dress It Up contest banner

We know you’re all on Instagram, which means you should be following us!  In the event that you’re not, you didn’t get a chance to see the SUPER fun contest we have going on where you could win $50 in Dress It Up buttons!

Head over to our Instagram (@dressitupcrafts), give us a follow, repost the image and tag it #dressitupcontest for a chance to win!  We will announce the winner one week from today!

Dress It Up contest

How to Make a Paracord Bracelet with Dress It Up Buttons!

JJB paracord bracelet 2 banner

When you’re getting ready in the morning, do you face the difficult decision of whether you should wear survival gear or stylish, fun summer attire? Are you often on the fence about whether you should wear your load-bearing vest with a small first-aid kit, magnesium/flint fire starter, and water purifier or a light, chic blazer with your favorite brooch? We’ve all been there one or a hundred times. Here’s a great way for you to have the best of both worlds! Make a cool, colorful paracord bracelet and everyone at the office will be jealous, while you’re simultaneously prepared to make a snare trap in case the zombie apocalypse strikes when you’re at work, away from your stock pile of food (I hear co-workers are good eatin’!). If life is a game, BE PREPARED TO WIN… And look cute doing it.

What you’ll need:

Paracord (any colors you desire), EZzzy-Jig (optional), scissors, lighter, ruler/measuring tape, Dress It Up Buttons (“Something Fishy” shown in directions)

What to do:

Start by cutting two 6′ strands of paracord.  You can use two different colors, or the same color if you’d like.

Take your first paracord strand and loop it with one side being about 18″ long.

With your second paracord strand, tie a knot around the loop, leaving one side to be about 18″ on the same side as the 18″ end of your first paracord strand.

JJB paracord 1

Take the two 18″ strands and put them in the center, separating the two longer pieces to each side.

JJB Paracord 2

Take one long strand and wrap it around the two middle strands from the back to the front, putting the end of the long strand through the loop it makes.  do the same for the second long strand.

JJB paracord 3

Tighten loops while sliding them to the top and continue pattern until you are ready to put on your first button.

To add a button, take one strand from the center of your bracelet and thread it through the shank (or loop) on the back of the button.  Slide the button up as far as it will go and continue your pattern around it.  You can use as many or as few buttons as you would like, but to use a whole pack (about 5 buttons), I suggest putting a button on the bracelet every 6 loops of a single color.  Once you put your button on the bracelet, continue the pattern, adding buttons as you go.

JJB paracord 4

When you have reached the desired length of your bracelet, take all four strands and tie a knot about an inch from where your loops end.

Cut the excess paracord off with your scissors and singe the edges with a lighter to stop them from fraying in the future.  When the ends cool, your bracelet is ready to wear!  Put the bracelet on and put the knot through the loop!

JJB paracord bracelet 2 JJB paracord bracelet 4 JJB paracord bracelet 5

As always, send photos of your crafts to dylan.smith@jessejamesbeads.com to have your work featured on the Dress It Up Craft Blog and receive a fun goody bag!

DGS